Showing posts with label gardening. Show all posts

Wednesday, June 18, 2014

How to Build an Herb Spiral

After Bea decided to turn the ugly dead-tree laundry pole into a focal point (a bottle tree!) for our new garden, she also wanted to put in an herb spiral at its base.  Neither of us had built one of these before, so after a lot of googling, we settled on the following procedure.  All told, it took about 8 hours to build, albeit that was with only one person working, and with some breaks factored in as part of that time estimate.  It's probably a half-day project with a couple of people just gettin'-it-done.

Step 1: Find some old bricks or stones (or new ones if you prefer)

Bea found a huge pile of weathered old bricks under the overhang on the back of the outbuilding we call the chicken coop (no, we don't have chickens...yet).  She had been trying to come up with a project to use them up so we could walk through without clambering over the brick pile; this find helped inspire the herb spiral idea in the first place.

Step 2: Set up your circle

Once you have a good supply of bricks, install a stake temporarily into the spot you want to be the center of your herb spiral.  In our case, we didn't need a stake, we just worked from the dead tree/bottle tree.  Get a string or tape measure and use it to mark out a perfect circle.  Remove any weeds/vegetation growing in this area (Bea dug it up lightly to loosen the soil).  If you were doing this in the fall, you could put down cardboard or layers of wet newspaper to avoid the weed removal, but in spring when they're growing rapidly, it's best to just put in the effort to remove them.  Our circle has a 3' radius.

Step 3: Lay out your spiral

Use your bricks/stones to mark out a spiral.  Keep in mind that depending on what you plan to plant, a lot of herbs like to spread out so they'll need plenty of space.  We only built a two-layer spiral with each layer being 18" wide.

Step 4: 

Fill in your spiral with a layer of compost.  You can put compost in between the bricks too to help hold everything together.


Step 5: Cover with straw

Make sure you get straw, not hay -- hay is for animals to eat and thus contains nutritious seed-heads (which will sprout in your garden).  Straw is just dry stalks without seeds, and much more suitable for use in mulching a garden!

The straw will break down slowly and continue providing nutrients to your growing plants over time.


Step 6: Build up a second layer of bricks

Place a second layer of bricks over top of the first around the spiral.  You'll want your spiral to end up sort of like a pyramid/cone, with the center being tallest -- so taper off on stacking the bricks as you get towards the bottom.  Don't forget to stagger your bricks as you stack them, like in a brick wall!  So each brick you place on the spiral should overlap two bricks below.  If you're working with brick pieces instead of whole bricks, just do your best to overlap joints so they don't fall over and collapse.

Step 7: Fill in with compost, repeat as many times as needed

You'll repeat the brick/compost/straw layers until you either run out of materials or until your spiral reaches its desired height.  Ours is 4 layers of bricks at the top and 1 at the bottom, or about a foot and a half tall in the center.

Step 8: Get ready to plant!

Part of the beauty of an herb spiral is that it gives you multiple “planting zones" suitable to growing a variety of herb plants.  The soil at the top of the spiral will dry out quickest, while the bottom of the spiral will remain moister.  In the northern hemisphere, your southern part of the spiral will get direct sun most of the day while the raised nature of the spiral will provide some shade for the northern side.  The taller and larger your spiral is, the more customized you can make each position for your plants (just don't forget you'll need to be able to reach into the middle to harvest!).

So now you've got some choices to make -- note that some herbs do well in multiple positions:

Sunny Dry Positions (at/near the top of your herb spiral) – aloe vera; bay tree; garlic chives; lavender; marjoram; oregano; rosemary; sage; tarragon; thyme

Shady Dry Positions (on the northern side, in the shadow of your spiral and/or taller plants) – basil; nasturtium; oregano; parsley; sage; tarragon; thyme; yarrow

Sunny Moist Positions (middle/southern side of herb spiral) – arugula; bergamot; chives; cilantro/coriander; nasturtium; parsley; sorrel; spring onions; strawberries

Shady Moist Positions (middle/northern side of herb spiral) – arugula; borage; chamomile; chives; parsley; sorrel; strawberries; violets

Sunny Wet Positions (bottom of herb spiral on the southern side) – chamomile; mints

Shady Wet Positions (bottom of herb spiral on the northern side) – ginger (harvest before frost); lemon balm; mints; watercress (often installed in a shallow pool at the very bottom of herb spirals)

Chris came out to help right in time for the fun part!

You'll have best success if you plant transplants (as opposed to direct seeding) in your herb spiral, so start by placing all your plants in pots around the spiral.  This way you can move them around to space them evenly and move as many times as you need until they're exactly where you want them.  Once you're ready, just go ahead and pop them into the ground.

Since the spiral is constructed of straw and compost (both of which drain very easily), you'll need to water deeply and daily until your new plants are well-established!

East side
South side

West side
North side
Our completed bottle tree/herb spiral garden centerpiece!


Tuesday, May 27, 2014

Our First Pest Infestation: the Aparagus Beetle

Common Asparagus Beetle
There's some misconceptions about Organic Gardening that I've run into repeatedly over the years, including the idea that growing vegetables & fruits organically means taking a “do-nothing" approach.  But in fact, just because you're not going out and spraying chemical insecticides, it doesn't mean you sit back and let the pests take over your crops either!  There's plenty of approved control methods available for the organic gardener, ranging from natural sprays to releasing parasites/predators, and good ol' fashioned hand-picking.  Hand-picking is a fancy way of saying just squish the bugs!

Depending how much area you have to cover, the squish method of controlling pests may or may not make sense.  In our case, we have a small asparagus patch that has been struggling along for the past month or so, producing some good stalks at first but then producing spears with curled, ragged, unappetizing looking tops.  We originally thought it was because the hose didn't reach that far and we'd had a couple weeks without much rain, but then we harvested a couple of spears with tiny tell-tale black things sticking out the side, almost like tiny mouse droppings -- but we recognized this must be some kind of egg.

A little searching around the awesome UMD Home & Garden Information Center website brought us to this page showing a photo of the eggs on the asparagus spear.  We went outside to double-check our research and to see if we could find any adults or larvae on the plants (these beetles pupate in the soil).  Lo and behold, our plants were completely covered!!!  Click any of these photos for close-up views.  (Photos by Chris Maxwell)


We read that asparagus beetle adults usually drop straight down when you shake the plant, so if you hold a bucket of soapy water under the plant, more than likely they'll just drop straight in.  This worked very effectively for us!

For the eggs and the larvae, you just have to pull them off and drop them into the bucket by hand.  If you're feeling a little vengeful, you can also squish the larvae, as they make a satisfying POP!  However, if you're not in the mood for squishing bugs, the soap should break down the oils of their soft bodies and kill them soon enough.

Since we live in an area where there are multiple generations of asparagus beetles each summer, we'll check over the patch about once a week to make sure to stay ahead of them!


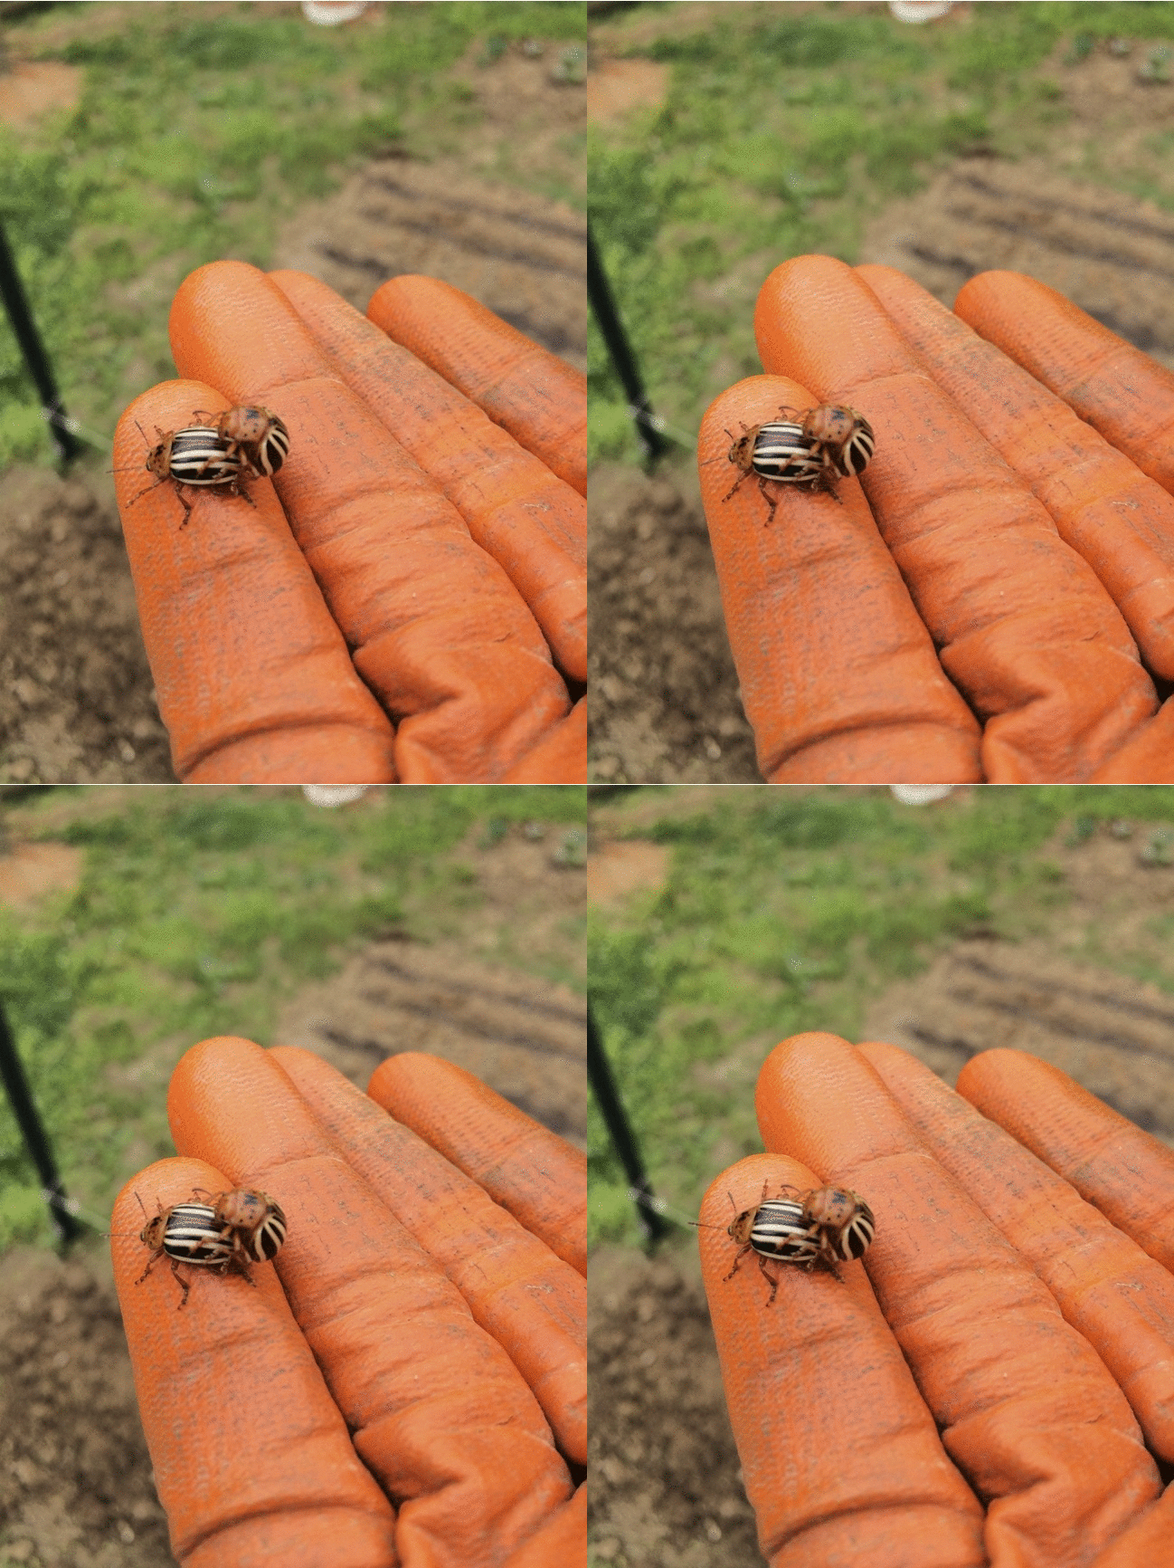
Of course, if it's not one thing, it's another.  Right after we were pretty sure we'd gotten all the beetles off the asparagus patch, we caught a pair of Colorado potato beetles in the act of reproducing their next generation!


But more on that some other time.  (sigh!)


Tuesday, May 20, 2014

A Quick & Cheap Deer Fence

Our beans just starting to
germinate -- we needed a fence!
As more and more of our neighbors find out about our plans for our garden, the one thing we've heard over and over is that we're wasting our time because “there's waaaaaaaay more deer now than there used to be."  A lot of folks have had such bad luck with deer eating everything that they've given up on gardening altogether.  We hope this isn't in the cards for us, but we do want to protect our investments (of time, money, and future food!), so we just installed a deer fence that we hope will suffice.

The general rule on deer fencing is that you either need a barrier that's electric, one tall enough that they can't jump over (8' minimum), or a double layer of fencing that confuses the deer's poor sense of depth perception so it won't jump over a shorter run.  Due to owning some leftover 8' tall deer netting, we decided to go for the barrier based on height.

Installing a deer fence June 2011 back in DC
Last time the two of us worked on installing a deer fence was at a 1.5 acre community garden in DC.  That was a project done on back-to-back 90-degree, 90-percent-humidity days common to June in DC, working 11 hours of hard labor each day, all weekend long.  It took a grant and a lot of fundraising to cover the materials cost of $5,300 and it took over 350 person-hours of volunteer work to bring that deer fence installation project to completion!  (Side note: this original deer fence installation happened the weekend immediately preceding the marathon back-to-back 13-hour labor-intensive days deconstructing our Hoophouse 1.0, culminating in a visit to the ER for Chris and the unrelated but simultaneously received announcement of Bea's parents getting divorced after 30+ years -- leading June 2011 to be permanently emblazoned in our minds as the “Month from Hell".)

So when Bea said those two words “deer fence", it was received sort of like some curse words that conjured up a whole host of bad memories promised never to be repeated.  But Bea assured Chris the deer fence this time would be relatively painless, and we got started looking for some 8'+ tall posts.

Since we couldn't find enough materials quite tall enough lying around our house, and we didn't want to spend much if any money on this project, we went on our first trip to Charlottesville's Habitat ReStore -- very similar concept to where we used to work at Community Forklift.  Unfortunately for us, this ReStore had a WHOLE LEVEL of awesome furnishings but very little in the way of lumber, and no scrap metal or pipes like we'd thought we might be able to use for this project.  Bea did manage to find two 4-packs of 8' 2x2s standing upright in the corner between two sets of stair treads, about the only lumber in the whole warehouse.  Of course she also got side-tracked by the amazing deal on pepper plants ($2 for 4-packs!) and was able to find replacements for most of our pepper varieties that never germinated.  We left calling the visit a win!

Anyway, we picked up the packs of posts for $3 each and bought some 2" ID (inner diameter) pipes at Lowes.  We got both metal (2-3/8" OD chainlink gate posts) and plastic (2" PVC) since we weren't sure about how pounding the PVC into hard clay would work, but it seems to have worked successfully so we can now return the metal chainlink pipes for our money back -- phew! They were expensive!

Taking breaks is crucial!
We cut the PVC into 30" sections and used a PVC cap set on top to pound on with a sledge hammer (to prevent the pipe itself from shattering from the impact).  We'd recommend buying the next-up size of cap so you don't have to work so hard to pry it off each time!  Or use a piece of wood to absorb the force, which is what we ended up doing after the cap split into pieces.  Pound the pipes into the ground halfway (15").  Then set a 2x2 upright in each pipe (square peg in a round hole, but it fits!).  We spaced the pipes/posts at 10' apart all around the perimeter of our garden.

For our corners, Bea found these 5-gallon buckets of concrete that she'd stuck 4x4s in ages ago in a half-witted scheme of making a DIY hammock stand.  (Of course we moved these here “just in case they're useful some day"!).  In any case, they were the perfect sturdy corner posts; we had to dig out a hole the size of a 5-gallon bucket instead of just digging out the size of a 4x4 and adding a post plus concrete like we would've done if we hadn't already had these bucket-posts lying around.


We had only found a total of 8 2x2s at the ReStore, so while we could've bought more at Lowes, we also saw that we had a stack of 3 tall laundry posts we had dug up out of the yard from the house up north we're selling -- so we decided to use one of those, which gives us a nice T-brace arm from which we can hang Chris's special strawberry planter out of the reach of deer!  His strawberry planter was a birthday present so he won't have to spend too many back-breaking hours weeding another strawberry patch and end up in months of physical therapy (like he did last year -- that was bad news!).

Once we had all our various types of posts installed, it was very quick and easy to just unroll the deer fencing and use zip ties to attach it to the posts.


We used the house as our 4th wall of our fence, and tied a garden shed into one of the sides to cut down the amount of materials we needed.  We just used screws and hooked the deer netting over them for a slightly annoying but simple access point in case we find we want more than one entrance.


Fencing complete!
Old pegboard frame finds new life as a gate!
The only tricky part was figuring out our primary gate.  Back in 2012, we had seen a couple of metal frames in the yard at Community Forklift, identical to each other except that one had a pegboard attached to it.  At the time, Bea had really wanted a pegboard hung in the workshop to keep track of all our tools, so we'd bought a piece earlier that year but hadn't figured out a frame for it yet to attach to our workbench.  Since the pegboard/frame was sitting out in the yard and had a lot of water damage, Bea paid $5 for the frame that came without the pegboard attached so we could attach the one we already owned.  Anyway, it turned out that whoever had donated those to the warehouse must have had some additional hardware to attach the pegboard because we never figured out how they went together, but eventually moved both pieces here still hanging out uselessly near our workbench, where they continued to sit until we were prepping for our housewarming and Bea said “enough is enough, let's just hang this pegboard on the blank wall here."  We got some 1x4s and Chris hung it up beautifully, no frame needed!

So now we had this extra metal frame and Bea said “now what do we do with this?" and as a joke, Chris said “it could be our garden gate" and Bea took him seriously -- this is how most things in our marriage happen, actually starting with our getting married at a carousel.  What Chris proposes as a wacky & outlandish out-of-nowhere idea somehow becomes reality with a little finagling & a lot of stubbornness!

Sledgehammer made it work perfectly!
Notched the frame to fit the bolt
Bea bought a chainlink gate hinge kit for $15 that was made to fit with a professional chainlink gate (which would cost about $70, too much).  Bea said, “I think this'll work great."  Chris said dubiously, “You mean fitting a square frame in a round bracket, again?"  Bea made a couple triangular marks with a sharpie and said, “just use a sawzall to notch the rib here and here."  Chris did, and it made the pegboard frame that had been slightly too wide fit perfectly through the bracket!  He got everything attached firmly enough with an extra long bolt & oversized washers, plus a little coaxing from a sledgehammer to bend the bracket.  The final step was the latch which also needed some “modifications" but now works perfectly to make the garden easy to access by humans but impossible (we hope) for deer!

Area fenced in:  50' x 45'
Total cost for fence:  $66
Total time to install fence:  18 person-hours

Chris takes a well-deserved break, content knowing
that no deer can get to him inside our new fence!
In theory, this is a semi-temporary fence, although we do hope it'll last at least a couple of seasons.  We'll update as we figure out how well it works -- or doesn't!


Wednesday, May 14, 2014

First harvests of 2014

We're excited that we've already harvested over 40 lbs of food from our garden!  Bea's set up a garden tally page where we'll be keeping track of how each crop fares throughout the season, which we plan to update every couple of weeks or so.

We bought a secondhand hardware-store style scale from Community Forklift, and hung it right in the hoophouse to help us keep track of how much food we grow this year.  Bea has a spreadsheet (of course!) to keep track of how well each variety does.  We also have a somewhat vague agreement to keep track of the approximate economic impact of our garden & thus the value of Bea's “income," based on multiplying the typical local per-pound price by each crop's productivity.  We figure this first year or two will actually be a loss, but it'll be interesting to see how/if all the work in the garden actually affects how much we spend on groceries, snacks, etc!

We predicted that our first harvest of the year would be something like radishes, which typically are the fastest-growing veggie that we plant.  However, as a total surprise, the first thing we ate that we grew here at the farmhouse was a pound of Shiitake Mushrooms!

Bea has ideas of some day growing shiitake logs in our “woods" which is currently a tangled mess of invasives, but until we have a suitable site (and at our current rate of progress it might be a while!)  Chris wasn't sure that he even liked shiitakes so Bea ordered a couple of self-contained indoor mushroom-growing kits to keep on top of our fridge over this winter.  The shiitakes produced their first flush of mushrooms on April 1st, within 2 weeks of setting up the kit, and the Lion's Mane mushrooms only took 4 weeks to grow.

We chose to grow Lion's Mane mushrooms because it supposedly tastes like lobsters!  We tried cooking this recipe for Butter Poached Lion's Mane Mushrooms, which Chris says “tastes like fried butter."  It turns out that neither of us has actually eaten lobster in any recent memory, so for all we know it could've tasted just like lobster.  We can say with certainty that it was chewy, buttery, and delicious!


Of course, our radishes weren't far behind the mushrooms.  We got to enjoy the first of our Easter Egg radishes with visiting family while hosting an impromptu Easter brunch!  This variety is a mix of brightly colored egg-sized radishes, vaguely resembling dyed Easter eggs.  Not too spicy, but crisp and delicious!

Trying not to waste anything, Bea has been cooking up our turnip green thinnings.  We don't think we know anyone who absolutely loves turnip greens, but they're certainly healthy and definitely edible -- preferably marinated with some onions, garlic, soy sauce, and dry sherry!  Usually we end up working outdoors until just past every last scrap of daylight, so our headlamps are now stored right by the door for late evening harvesting/watering.  We've learned it works better to get things planted when you can actually see what you're doing, but having one person water our garden by moonlight/headlamp takes about half an hour and by then the other person can usually have dinner just about on the table, so for now it's a peaceful way to end the day's work (at least until we get our drip irrigation set up!).

Bon appetit!
Bea's first attempt at food art, decorating a salad made entirely of our own harvesting!


Wednesday, April 30, 2014

Signs of spring

For as long as I (Bea) can remember, Autumn has always been my favorite season.  I love the color and crunch of the leaves, the juxtaposition of the first cooling winds with the still-warm sun hitting your skin, the feeling of abundance but impermanence of everything around you.
Redbud

This year though, after a really bitter cold winter, spring seems to be vying for that favorite season prize in my heart.  Part of it is being in a new place, coupled with my terrible tree-bark ID skills.  Everywhere I turn, I see what I have perceived as a gray looming stack of twigs in the background of our yard, now surprising me with beautiful spring blooms.  Some trees & shrubs I had half-way considered chopping down turn out to be fruit-bearing!

Spring bulbs are popping up everywhere & changing the routes of walking paths we've gotten in the habit of taking all winter while the bare ground presented us with no obstacles.  Areas we thought were only full of weeds turn out to have been carefully landscaped at some point in the past, just overgrown.  The winter snows have killed back most of the weeds and we are seeing the gardens take a fresh start.


Last November, we dug up and divided a bunch of herbs we'd planted at our old house and community garden plot back in DC.  In 5-gallon buckets, we drove it all down here and popped it into a front garden bed that looked totally overgrown (besides an enormous butterfly bush).  We hoped that moving the herbs as they were going dormant would allow them the winter to recover and hopefully survive.

The first signs of life we saw this spring were some of our transplanted sorrel leaves in early March.  Daffodils started peeking their stems up around the same time, and then some chives.  At first I was out there encouraging the plants to grow, then I saw on the weather forecast that a mega snowstorm was predicted just after St Patrick's Day, so I switched my tune to telling the plants to stop growing & wait.  Not that the plants paid any attention, but somehow they were able to survive all the wintry weather, even a late mid-April freeze!  When the snows and frost receded and we saw leaves that were still green, we were very happy!

At the end of March, the raspberries that we planted just before Christmas also finally started budding.  From walking among the three rows of trellises, it looks like we had a pretty great survival rate despite giving those plants a rough start (storing them in a trash bag for 3 months!)  What a relief after all the effort building those trellises took!


Over on the other side of the house, the asparagus bed is slowly coming alive and yielding its delicious spring treats.  So far, unfortunately, none of the purple asparagus that we dug up and transplanted has sprouted, but the green variety that the previous farmhouse owners grew is pretty darn tasty.


In the hoophouse, the seeds we started in trays began germinating by the end of March.  At least every other day, I go out there and inspect the trays for new sprouts.  Depending on the size of the seed, the signs of life can be extremely tiny, but always very exciting!


Turnips and carrots are growing nicely in the hoophouse
Our seeds planted in the ground in the hoophouse were also starting to come up by the end of March, and many are now of harvestable size.


Radishes are always one of the earliest spring crops, only taking 3-4 weeks from when you pop the seed in the ground until you're eating them up.


The alien potatoes Chris planted back in March have grown leaves and appear to be doing well!


Indoors, our tomatoes had grown big enough they needed repotting into individual containers.  I had been avoiding this for some time because it's almost time to plant them outdoors, and repotting takes a bunch of potting soil and time to make sure everything stays labeled properly throughout the process.  But the main reason I was avoiding this task was due to lack of space.  The shelf I've used for seed-starting indoors is also the winter respite for various houseplants, so it only has enough space for 4 trays of vegetable/herb seedlings.  Unfortunately, with our plant-chewing cats, we have to keep the plants behind a window-screen setup to ensure survival!  However, while we were up in Maryland working on the house for sale, we picked up an amazing second-hand super professional plant growing rack from Community Forklift.  This new setup holds 8 trays, and so finally gives us the space needed to expand our indoor growing area and keep the pepper trays directly on a heat mat -- which has finally yielded just a bit of increased germination.  We're probably still going to have to buy some pepper plants, but most other plants we've seeded this spring have germinated great despite being older, expired seeds.

As more and more plants bud out in the yard, we realize we planted our herb garden in the middle of what was once a butterfly garden -- hopefully the butterflies like the smell of our herbs!  A tree over by the main garden turns out to be a plum tree -- super exciting!  We think another tree in the back yard is some kind of pear tree, and the tree under our streetlights looks to be a cherry of some kind.  We're hoping of course that these are productive and delicious, but for now we are just enjoying the ornamental quality of the beautiful spring blooms throughout our yard!

Possible cherry tree??

Sweet flowering almond bush

Dogwood

Hyacinth among daylilies


Our herb/butterfly garden in front of the farmhouse, at sunset
HAPPY SPRING!