Well, it's official -- the Fixettwell Family is now a FARMily!!! A friend generously gifted us a dozen hens and one rooster. We went to her house to pick them up and she caught them one by one to pack them into moving boxes. Chris had OK'ed this scheme, but was not completely convinced about this whole idea...even after it was already happening!
By the time we got back home, it was already dark and the chickens were already asleep, so we just opened up the lids but left them in the boxes overnight. In the morning we were pleasantly surprised not to be woken up super early by crowing, so we went out to see how everyone had survived the move and see if they were enjoying their new digs -- but when we opened the door every single chicken was still just sitting in its moving box, looking completely dazed!
Chris emptied them out and they quickly got to work eating all the weeds and grubs they could find in their new coop.
Before long, we got a frantic-sounding message from our friend that she'd found one little hen who had somehow escaped the moving escapade -- NO HEN LEFT BEHIND! We went back to Scottsville to pick her up, so ultimately we have 13 hens and 1 rooster.
We had no real idea about how to keep chickens, so we started googling what kind of food we could give them in addition to their pellet feed. Turns out chickens eat pretty much whatever we do, so they got inundated with tomatoes that were too old for people and pear cores -- they loved it all!!!
After doing some research, we discovered our coop was not really big enough to keep this number of hens happy -- our friend also let us take the chickens' old fencing, so once the weather cooperated we were finally able to enlarge their pen with a nice big outdoor run.
The chickens are coming! The chickens are coming!
Happily exploring their enlarged pen
Chris decided to name our rooster Sir Bubba Crowsalot. He is a very magnificent creature, and still young so hasn't fully developed his spurs (or his personality?) yet.
Bubba has already somehow developed a
habit of getting out of the fence! Chris found him wandering around near our trash cans, just strutting his stuff like he was supposed to be there. He likes to attack Chris's feet, which has already led to a couple of battles for the spot of “top rooster". So far Chris is still winning!
The next hen to get out was the yellow hen (she doesn't have a name yet). Then the all-black hen (Old Crow) somehow spent the entire night outside! Turns out hens are a lot more amenable to be chased back into the pen than that rooster!
The grass is always greener...
When we got these chickens, they had already begun their winter molt. After a week of no egg production combined with Daylight Savings Time (meaning they have already roosted for the night by the time Chris gets home from work), we got out of the habit of checking the nest boxes. About a week later, Chris unexpectedly discovered that at least one of our hens had been quite busy! We unfortunately had to discard most of this first egg “harvest" because we had no idea how long they had been sitting around and didn't want to take the risk. However, now the hens are beginning to produce an egg here & there, and these days they are much cleaner and more appealing -- yum!
So far the chickens have all been a welcome addition to our farmlet, and we're even growing quite fond of Bubba and his antics!
Happy belated holidays and New Year! Rather than our customary TL;DR update, we've elected to make a calendar (of the past!). Luckily, whencanireusethiscalendar.com
indicates that 2014 calendars will be usable again in 2025. Also, we
didn't fill in the dates. Basically, we just made the back page of
2014's calendar with our top picture of each month--here it is!
By
way of captions: we (re)built a hoophouse, cleared a bunch of invasive
brush, planted mutant potatoes (and lots of other delights), installed a
2,500 square foot garden, explored our six ancient outbuildings, built a
bottle tree and herb spiral, harvested over 980 lbs. of homegrown food,
cut off five years of ponytail, enjoyed some well-earned rest, cleaned
50 years worth of dust out of the general store (and hosted a party in
it!), and unofficially launched Green Springs Gifts by attending a
holiday artisan fair. Whew!
So far all we've done in 2015 is adopt this adorablepuppy. Welcome to the Fixettwell family, Starlet!
Things are pretty good here. Can't wait to see what the rest of 2015 has in store for us!
-- Bea, Chris, General Burt Nurfur, Earl Grey Cat, and Starlet
One year ago yesterday, we officially became farmhouse-owners and began a new adventure together. What a year it’s been! Looking back on the past year, we have two totally opposite reactions, summed up as follows:
Bea: Living in the middle of nowhere is even better than I ever dreamed it would be!
Chris: I have so much constant stress and anxiety, all the time forever!
(To be fair, Chris had the same reaction to life in the big city. And the suburbs. He’s kind of an anxious person, sensitive to stress.)
Here’s a typical day as narrated by Chris:
Are our pipes going to freeze again tonight?
Will our vegetables die?
How can we beat back the Japanese beetles & squash bugs?
Is our well water poisoning us slowly?
What if our septic system clogs up?
What kind of chainsaw should we buy?
Will I ever get any sleep again or will we forever be pickling vegetables?
Why are these pears so weird?
What’s up with our internet – today?
Bea’s typical day (also narrated by Chris) goes more like this:
YES! Another day where everything rocks!
Today I will do so many projects all at the same time, and never go to bed!
How about digging while I boil the water, coring pears while I process the pickles, chopping onions while the pears simmer, and planting our fall garden while the sauce reduces? Maybe after Chris gets home from work we can build a fence before dark, eat a quick dinner, and then rearrange our furniture, and sort through two rooms worth of unpacked boxes! Maybe that sounds like too slow of a day…maybe I’ll have time to do some laundry too!
(SIDE NOTE: It NEVER all gets done!!!)
So, after a year, Chris has also come to appreciate some of the finer points of living in the country. In the past year, we have made some fairly significant strides at establishing ourselves in our new home.
We moved all our stuff in 3 (yes unfortunately THREE) moving trucks, have basically unpacked & decorated our new house, and generally settled in.
We bought – drove to Denver – drove back – and sold – a used cargo van, our faithful AdVANture Van.
Chris found a job, twice! Bea had her “last day” at her old job, thrice!
We won the National Reuse Contest by accident and ended up with a huge gift certificate for secondhand building materials, which we had to drive back to DC several times to spend up.
The aforementioned gift certificate helped us buy supplies to rebuild our 50’x20’ hoophouse, and complete it with gutters and a 500-gallon rain-barrel collection system (soon to be 1,000 gallons).
We battled a plethora of insect and mammalian enemies and learned to identify several types of bug poo. We also trapped (and released) a baby groundhog.
Bea joined the Central Virginia Master Gardeners and organized some gardening workshops, then volunteered weekly at the local food bank to help with their vegetable teaching garden.
Bea took some classes, read a lot of library books, and developed new hobbies exploring the wonders of things you can do with plants besides eat them (like natural dyeing, herbal medicine, flower pressing).
We digitized (60) 8mm silent films Bea's grandpa recorded of his kids (Bea's dad & uncle) between 1948 - 1969, and then scanned in slightly over (10,000) 35mm slides from his enormous collection. We're about 2/3 done with digitizing the Trickett archive, before moving along to the Maxwell digitization project!
We canned over 200 jars of veggies and fruit, a sum total of over 19 gallons of food! Also Bea filled our freezers. Two freezers that is. Bring it, apocalypse zombies!
Overall, both of us agree this new place suits us pretty darn well, and we're looking forward to seeing what the next year brings!
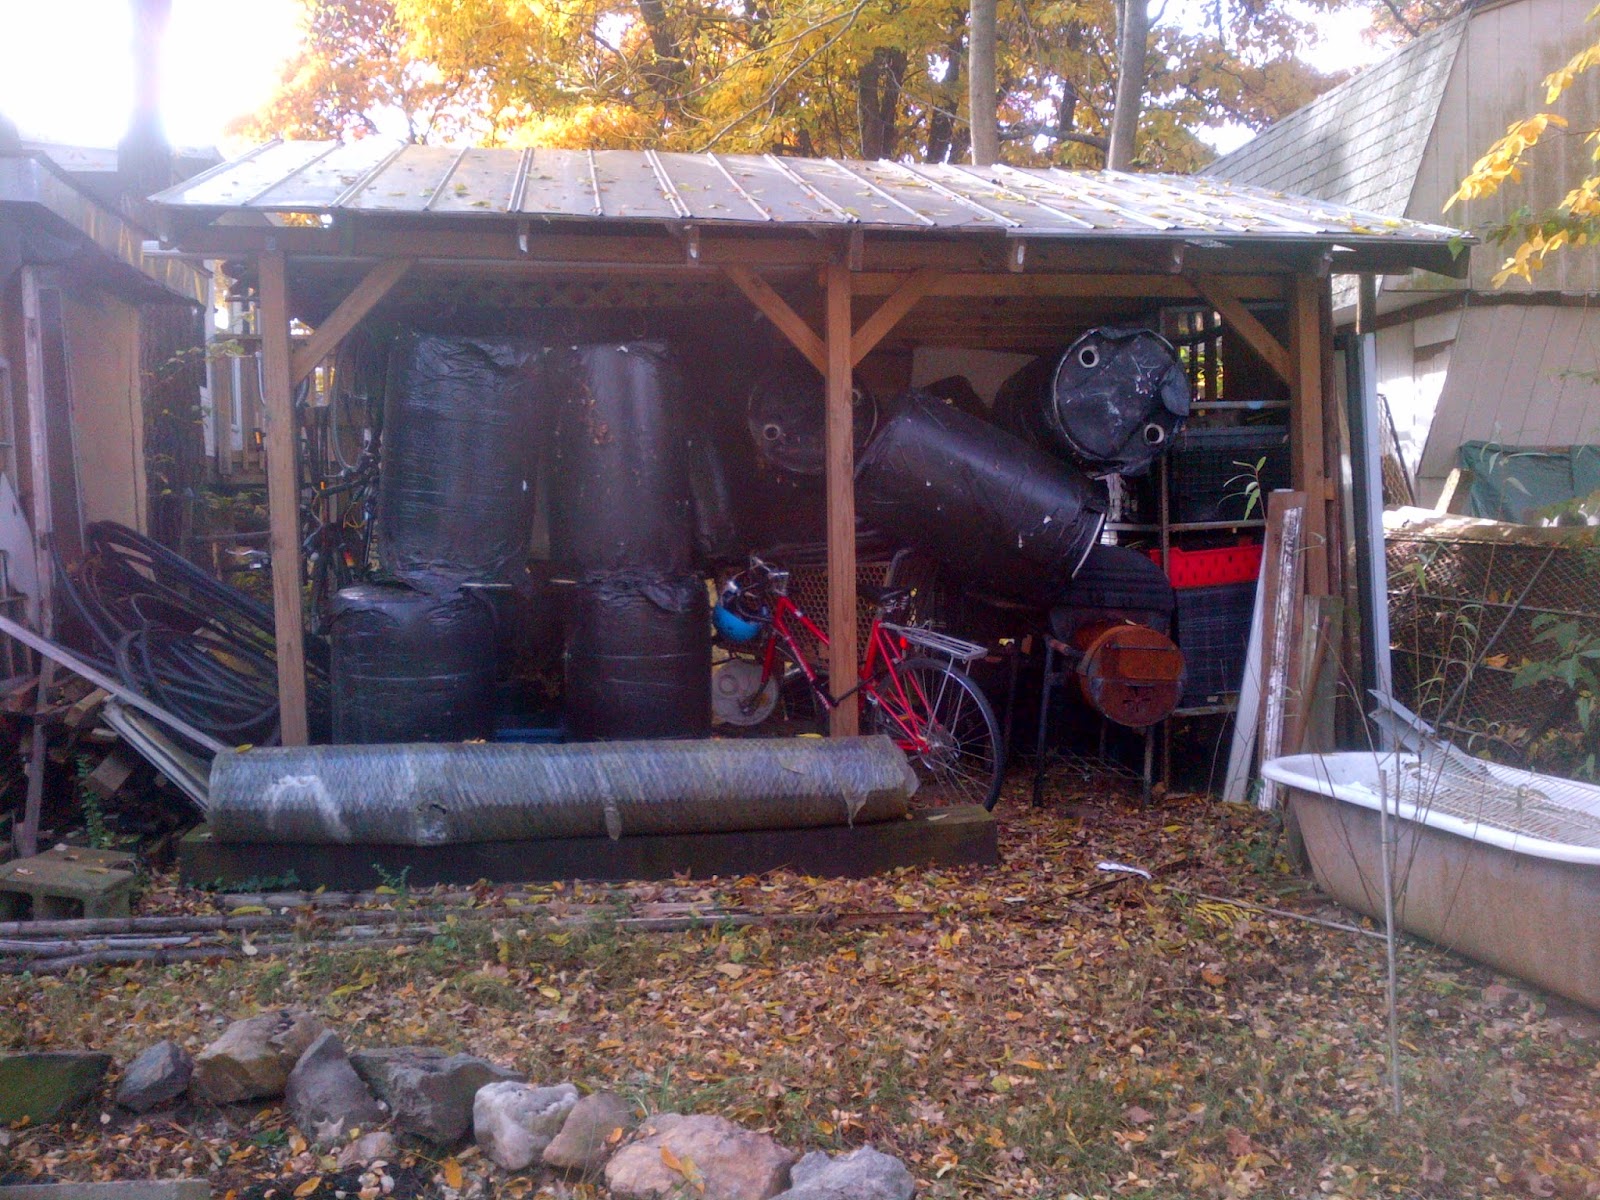
Over the winter, Bea spent
quite a bit of time wondering and researching why nobody ever seems to install gutters alongside their hoophouses. We're on well water and want to conserve as much water as possible so we don't run the well dry by watering our gardens! The hoophouse is a 1,000 square foot structure, which could collect 600 gallons with 1" of rainfall. Plus, we had already gone through the hassle of moving 20 non-nestable barrels several hundred miles when we moved here last fall, so we needed to put them to work for us!
Most hoophouse designs already feature a hipboard that runs the length of the hoophouse for stability -- Bea figured if you slanted this slightly then you would have a nearly perfect surface to mount gutters. Why don't more people do this?! After extensive research, Bea found mentions of gutters on hoophouses only three times.
The most helpful article was this tutorial from the Leopold Center of Iowa State University: Rainwater Catchment from a High Tunnel for Irrigation Use. They have a really professional setup costing $1,900 (including a pump) which unfortunately was way beyond our non-budget for this project; still, it was a great starting point.
Sara over at the “put your shovel where your mouth is" blog authored a post about installing gutters on her hoophouse. This was awesome to see that it could be done on a home-gardening scale without major expense! She told us it's way more popular in England to install gutters on “polytunnels" (as they call hoophouses across the pond).
Bea found this article on Seedstock, featuring some innovative permaculture techniques happening at Sunnyside Farm, including the first photo we'd seen of multiple barrels (like we intended to install on ours). Dru who writes at “Sunnyside Dru" featured posts about their rain barrels a few times between 2010-2012 (1, 2, 3) before they went “gutterless" in 2013. It sounds like removing/installing the gutters every time the season changed was a huge hassle!
So it didn't seem like anyone had a perfect DIY system they were truly happy with, and we didn't have a couple extra grand to spend on super professional cisterns and gutters. We'll write up how we connected the barrels and drip irrigation system in separate future posts, but for now we're just talking about how to hang the gutters themselves. (For how to build the hoophouse structure itself, see our previous posts here: “Hoophouse Step 1", and Windows, Doors, & Sides.)
How to Install Gutters on Your Hoophouse
Step 1: Acquire Supplies
Lumber: 2x4s +Cameron Forklift (our favorite DC-area reuse store) sells really affordable used lumber that's older and denser (i.e., longer lasting) than modern pine. They don't often have treated lumber, so we just buy untreated and paint anything that will be exposed to increase its longevity. You'll need as much lumber as the length of your hoophouse, times two if you want to install gutters on both sides (and why not?!). You'll also need some short scraps of 2x4s (about 1' each) for joining the longer sections.
Lumber: 1x2s You'll also need the same length of 1x2s. Check around, sometimes it's cheaper to use a table saw to rip 1x4s in half than to buy 1x2s.
Brackets We had no idea what this type of bracket was called, but Bea found it at Lowe's in the section with joist hangers. Here they are on their website. You'll need twice as many brackets as you have hoops.
1" self-tapping metal screws These are the same screws used to assemble the hoophouse. If you're buying new, just be sure what you get is rated to cut through steel, not just sheet metal.
Galvanized Screws Just regular 1-1/4" and 2-1/2" screws, galvanized for outdoor use.
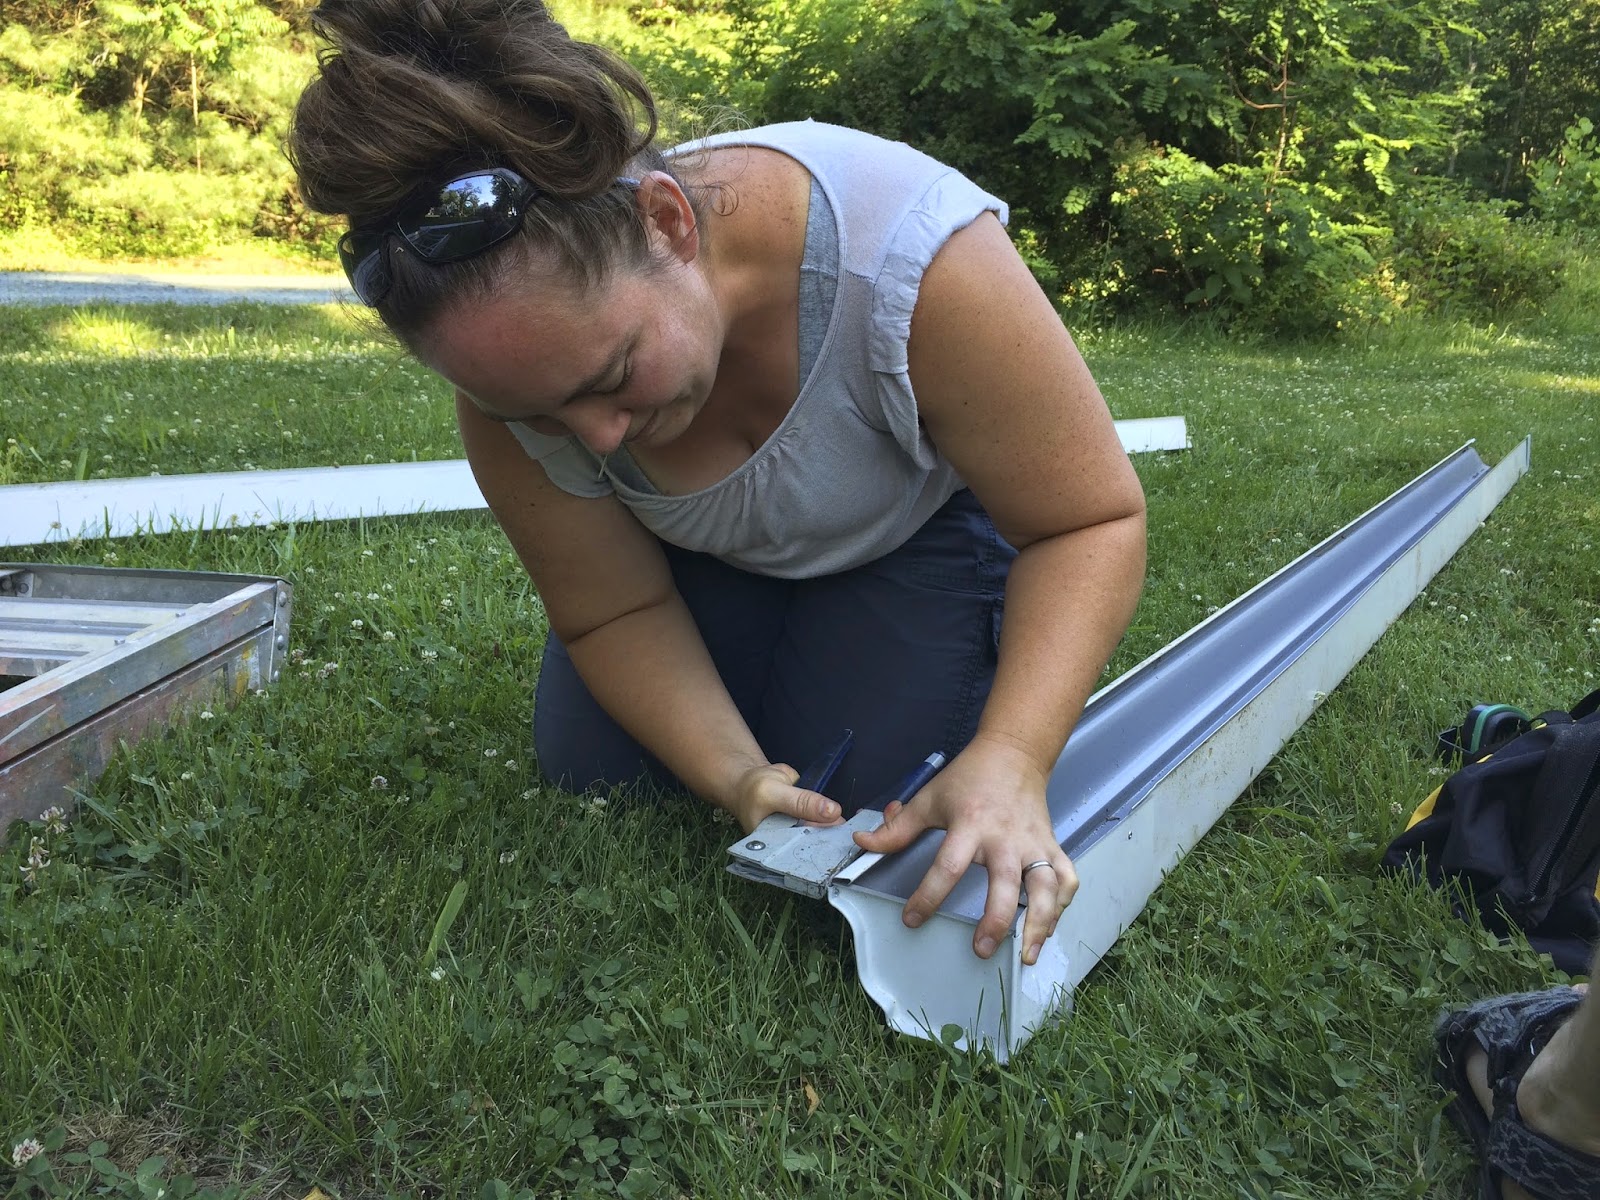
Rain gutters, “seamers", endcaps, downspout adapters, & downspouts We found what we thought would be most of the gutters we needed at Community Forklift; they were pretty heavily used (meaning bent and torn up in places). Unfortunately, due to having to trim so much scrap from the used gutters, we had to purchase half the gutters new. We used regular metal K-style gutters, which are about $7 per 10-foot section (new). You'll want as many feet of gutters as you have length in your hoophouse, times two assuming you want gutters on both sides, plus 1' per side for overhang. Add another couple extra feet to your shopping list “just in case." Seamers are used to join two sections of gutter together, so buy however many packs you'll need given the length of your hoophouse (they come two to a pack). For endcaps you'll need two left and two right endcaps. Buy 2 downspout adapters. For downspouts, you'll probably just need one 10-foot section which you'll cut in half.
Gutter Screws & Rivets Buy enough boxes to attach a gutter screw every 2-3'. Use aluminum rivets with aluminum gutters.
Step 2: Mark attachment points for your brackets
To do this, you'll attach a string with a line level to each end hoop, approximately 5' above the ground, running along the outside of the hoops. Your side will only roll up to this height, so you can make it higher if you want. Once your string is level where you want it, make a mark at its height on each end hoop. (Note: if you perfectly leveled your hoophouse when you built the hoops, you can just measure up from the ground. Ours sits on a slight slope, hence the line level.) Then before you remove the string, get a tape measure. You'll need to do a little math -- gutters should slope at least 1/2" for every 10' of run. So if your hoophouse is 50' long, you'll need to measure at least 2.5" up from the string on whichever end you want to be “uphill".
We turned our natural downhill side into the uphill side of the gutter system -- meaning that water will run off the roof, into the gutters down to a single downspout, then collect in rain barrels, and from there use gravity to flow back downhill through the drip irrigation system. In fact, taking advantage of this gravitational flow was the main reason why we didn't put a huge amount of effort into leveling the slight hill to install the hoophouse. But it means that when you look at the side of our hoophouse it looks like the gutters have a really steep pitch, even though it really falls only a handful of inches.
Anyway, once you have your pitch figured out, move the string on your uphill side up to the 2nd mark you made, and X out the first mark. Double-check that your downhill side of the string is still in its original spot, then go along each hoop and make a mark where the string crosses (it should make a nice long, even diagonal for you).
Left: original bracket Right: bent bracket
Step 3: Bend your Brackets to 45°
Since the point where you'll be installing the brackets on the curved hoops isn't 90° vertical, you'll need to bend the brackets to about 45°. It's OK if your hoops aren't exactly 45°, you'll be able to adjust them with further bending once you get them attached. Wear gloves since the metal edges can be sharp!
Step 4: Attach Brackets
Use the self-tapping metal screws to attach one bracket to each hoop using the the marks you made as guides.
Step 5: Attach 2x4 Hipboard to Brackets
Starting with the end hoop (doesn't matter which end), use the short galvanized screws to attach a 2x4 to the brackets. The board should be long enough to have attachment points on at least two brackets.
Step 6: Use wood scraps to join 2x4s
Use 2-1/2" screws to fasten a wood scrap to the end of the 2x4 that you hung up (use 3 screws in a triangle pattern) -- you'll want the scrap on the inside and overlap it about halfway (6" or so). Then hang the next 2x4 butted up against the first. It's easier to butt it up, then screw into the brackets, and come back and screw it into the scrap joiner once it's not levitating. Repeat this process until you get to the end of the hoophouse, then repeat again on the other side! (Even though this picture is of Chris painting, just check out the joint where he's working. That's the scrap-wood-butt-joint we're talking about!)
Step 7: Hang 1x2s
The 1x2s are going to be attached flush with the top of the 2x4. Their purpose is to create a lip so that the plastic sticks out past the gutter, and water will flow down into the gutter (as opposed to sliding down the plastic behind the gutter). Just use the shorter screws to attach the 1x2 into the 2x4. You don't want any joints to match up with the seams of the 2x4s, so you might cut a 1x2 in half and mount that, then use full pieces in order to stagger the seams. Or if you're using secondhand lumber, they're probably random lengths so chances are nothing will match up anyway!
At this point, you can really see where we messed up bending some of the hoops -- from certain angles the boards are totally out of line!
But from other angles, it looks just about perfect! We'll just photograph the hoophouse from there ;-)
Step 8: Paint if applicable
If you've used non-treated wood, you'll want to paint these because they'll be in contact with the plastic which accumulates condensation. Watch the video to see Chris demonstrate a neat trick for dripless painting:
With everything painted bright yellow, darkness descended and Bea packed up the tools for the night.
It wasn't until several months later (after completing the rest of the hoophouse build project), we finally got back to Project Gutters! You'll need your plastic covering attached before proceeding.
During the spring, after Chris accidentally ran over our garden hose with the lawn tractor, Bea set our gutters out in a long line as a hose-protector. This worked great, but when we finally got around to installing them on the hoophouse they had collected all sorts of grass clippings and insect ecosystems! Unless your gutters are brand new, you'll want to them scrub out because whatever's in them will end up falling into your rain barrels and you want to filter out any solid particulates.
Step 9: Connect endcap to downspout adapter
We started on the downhill end of our gutters. First, Chris notched the adapter so it would overlap and sit properly into the section of gutter. Remember to “Think like a raindrop" whenever you're overlapping gutter sections (or roofing, or anything dealing with moisture protection!) -- overlap the uphill section over the downhill section so water runs across the seam (rather than through it). Step two on this website shows a nice graphic of how to notch the gutter so they'll overlap properly. Then, rivet an endcap in place with aluminum rivets.
Step 10: Hang first gutter section on hoophouse
Hang the gutter on the bottom half of the 2x4 hipboard (butt it up immediately under the 1x2). You'll use 7" gutter screws driven into the 2x4; install them about every 2'. You want the downspout to hang out past the endwall of the hoophouse by at least 6", so the very end of the gutter won't be supported but for such a short distance this doesn't pose a problem. You'll want the sides rolled up so you can reach the gutter (or have a place to put your ladder). This would've been much easier to do before planting our beds!
Here's a closeup of how it fits right under the 1x2 -- so you can see the 1x2 just juts the plastic out over the gutter trough to facilitate water flow:
Step 11: Hang the rest of the gutters using “seamer" connections
Attach the seamer to the end of the next gutter section while it's still on the ground, it will make your life a lot easier! Pre-bend the back seam at 90° so it doesn't stick up into the 1x2. Then lift it up into place to butt up with the previously-hung gutter section. Once it's hung, come back and bend the loose end of the seamer down flat with both gutters it's connecting. For now just use these metal connectors; you can come back and caulk the connections at the end after you've hung everything up.
Step 12: Connect endcap on final gutter section
West side
Use a hacksaw or tin snips to cut the final section of gutter to length. Then use the aluminum rivets again to connect the other endcap to the uphill end. Hang it up and you're done guttering! The rollup sides roll up to the lowest part of the gutter.
East side
Step 13: Repeat on the other side of the hoophouse
Step 14: Connect downspout
Even if you're going to tie into a rain barrel manifold that isn't quite ready yet, you'll need some type of downspout to divert the water away from the base of the hoophouse. Here's our temporary one-barrel system. Stay tuned for the 20-barrel system, coming soon!


 Bubba has already somehow developed a

 When we got these chickens, they had already begun their winter molt. After a week of no egg production combined with Daylight Savings Time (meaning they have already roosted for the night by the time Chris gets home from work), we got out of the habit of checking the nest boxes. About a week later, Chris unexpectedly discovered that at least one of our hens had been quite busy! We unfortunately had to discard most of this first egg “harvest" because we had no idea how long they had been sitting around and didn't want to take the risk. However, now the hens are beginning to produce an egg here & there, and these days they are much cleaner and more appealing -- yum!